Introducing plentymarkets plugins
plentymarkets offers you the possibility to develop and modify plentymarkets plugins. plentymarkets currently hosts free plugins on GitHub. We are also hosting a designated plugin marketplace from which you can download plugins developed by plentymarkets and third party providers and also offer plugins you created. We recommend that you maintain plugins you create in a Git repository to ensure version control and allow error tracking.
To get you started, the documentation on this site provides an introduction to developing, managing and deploying plentymarkets plugins. Furthermore, it also documents the public plentymarkets plugin interface and the new REST API. You find multiple tutorials and guides for different plugin types. Build your first plugin in this tutorial.
Technology and requirements
For reasons of security and to optimise performance, all plugins are based on recent technologies. The source code can be developed using PHP 7. PHP 7 comes with many new features, reduced memory consumption and increased performance.
UI and content are rendered using the twig template engine. The twig syntax is easy to learn, and still offers great flexibility. Twig, both fast and secure, is compatible with PHP 7.
Vue.js is the JavaScript framework used for the plentymarkets standard design Ceres. Vue.js is lighter and easier to use than AngularJS and perfectly matches the Ceres plugin structure.
For maintaining stylesheets, the preprocessor SASS is used. SASS provides you with a large variety of features and abilities, making it the premier CSS extension language of the industry.

Plugin workflow
In this section, we will describe the general plugin workflow for developers, starting with creating a new plugin, modifying the plugin, as well as testing and deploying the plugin.
Creating plugins
There are several ways to create plugins. We recommend the following basic workflow when creating plentymarkets plugins.
- Create a new plugin file structure in your local IDE.
- Create a new Git repository and link this repository to your local IDE to ensure full version control.
Modifying existing plugins
You can also modify or extend existing plugins. The plugins can either have been created by youself or by third parties. We recommend the following basic workflow when modifying plentymarkets plugins.
- Link to an existing Git repository to clone the files to your local harddrive.
- Modify the files in your local IDE.
- Update the Git repository by pushing your changes.
Testing and deploying
When you are ready to test your plugin, deploy the plugin set in the plentymarkets backend.
- Push your changes to the Git repository.
- To test the plugin, pull the Git repository files into your plentymarkets Inbox.
- Go to Plugins » Plugin overview.
- Deploy the plugin set by clicking Save & publish plugins and open the preview mode to test its functionality. During deployment, the plugin syntax is checked and any errors are flagged.
- Correct any errors if necessary.
- When you are ready to publish the plugin, deploy the plugin set by clicking Save & publish plugins and activate it for a client.
Git version control
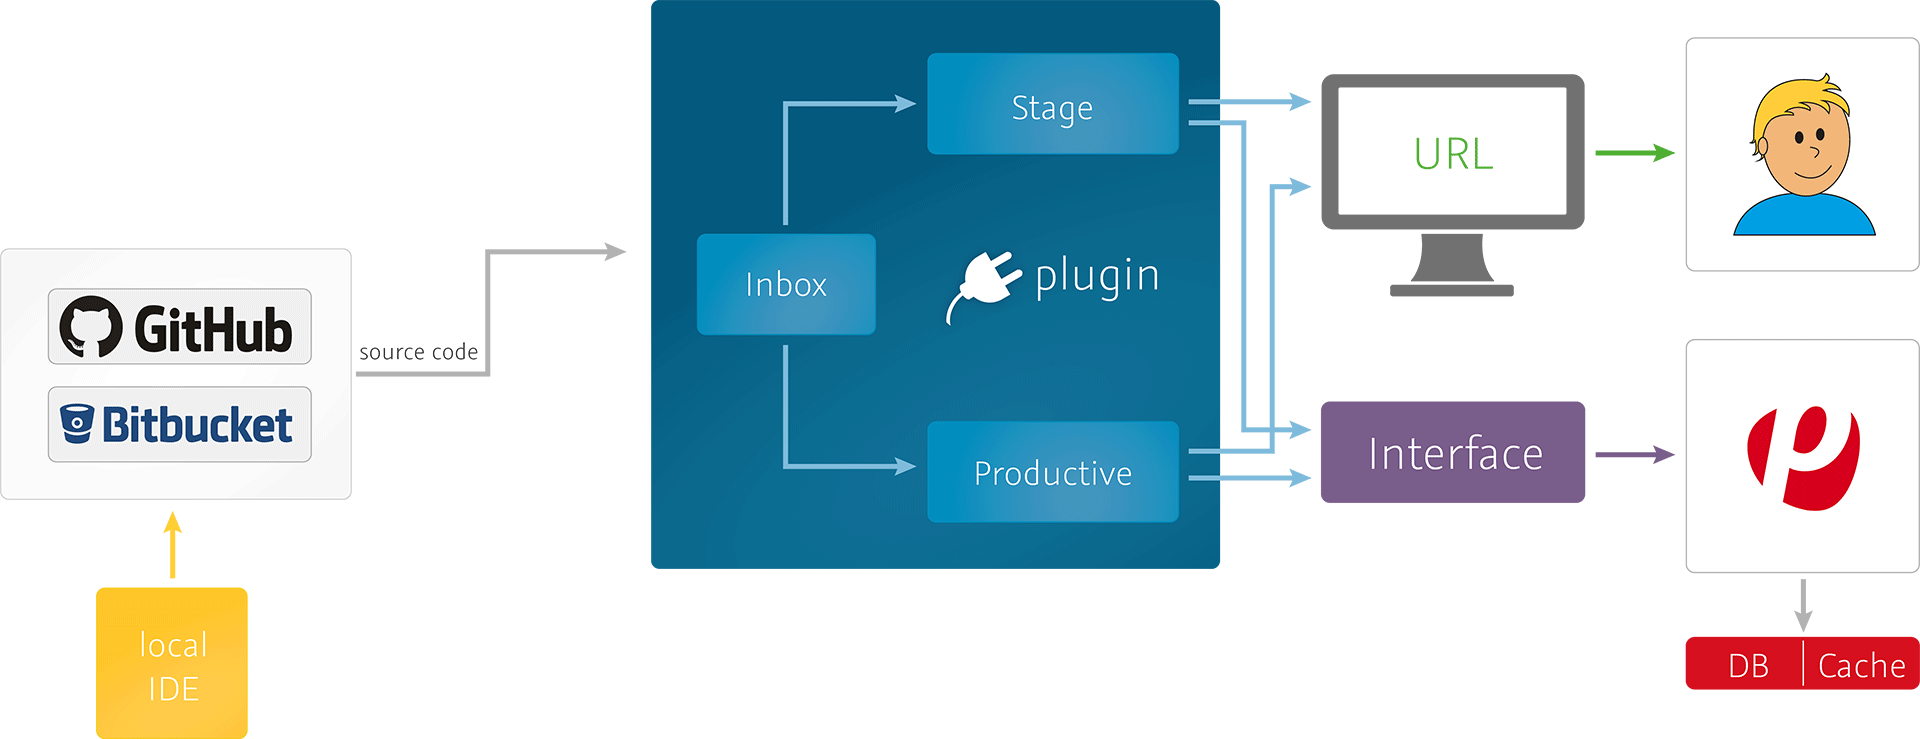
plentymarkets plugins are made available as Git repositories. The Plugins » Git menu provides a simple Git client interface that allows you to clone plentymarkets plugin repositories to your plentymarkets inbox. It offers all the benefits of full version control for plentymarkets plugin files hosted on Git-based version control solutions, such as GitHub or Bitbucket. We strongly recommend developing plugins using a Git-based version control solution. Version control provides you with the means to track and revert errors at an early stage of development.
Use the Plugins » Git menu to:
- clone an existing plugin repository to your plentymarkets Inbox
- fetch the latest changes from a Git repository to the Inbox without merging them
- pull the latest changes from a Git repository to the Inbox (fetch and merge) 4
- push your changes to a Git repository
- switch the Inbox files to any commit of a repository
The GitHub Bootcamp (https://help.github.com/categories/bootcamp/) provides a good starting point for users not familiar with the basic concepts of distributed version control.
We strongly recommend that you upload your plugin project files to a Git-based version control solution. Distributed version control offers the following advantages:
- Document: All changes are documented in individual commits.
- Restore: Files can be reverted to any of these commits. This means that all changes can be reverted.
- Archive: Changes are documented and can be traced later.
- Co-operate: More than one developer/designer can work on a single repository.
Deployment process
plentymarkets plugin sets are deployed in the Plugins » Plugin oberview menu by clicking the Save & publish plugins button.
The deployment process is also the point at which the syntax of the plugin files is validated. This means that the plugin syntax is not checked when plugin files are added to the Inbox. Plugins are not deployed if errors occur during deployment.
plentymarkets Inbox
You need access to the Plugins » Plugin overview menu of the plentymarkets back end to manage and deploy plentymarkets plugins.
The Plugins » Git menu provides a user interface for managing and deploying the plugin files in your plentymarkets Inbox.
Use the Plugins » Plugin overview menu to:
- create plugin sets
- accept the services of individual plugins
- select the plentymarkets clients (stores) plugin sets are to be activated for
- show any errors that occurred during deployment
- activate/deactivate plugins
- deploy plugins
- create and edit plugin settings
- delete plugins
Technology and requirements
Workflow & Deployment